Entries in large format (21)

Wednesday
Mar022011

The 52 Project, Week 29: 8x10 around New York

During my brief time in New York before and after my guest spot on the early November 2010 episode of the Film Photography Podcast, I had some free time to roam around some other cool places in New York and play around with the 8x10. The same as last time, these are all scans of quick and dirty contact prints on Oriental RC VC paper with very little correction in post. Click the scans for a better view plus exposure data.

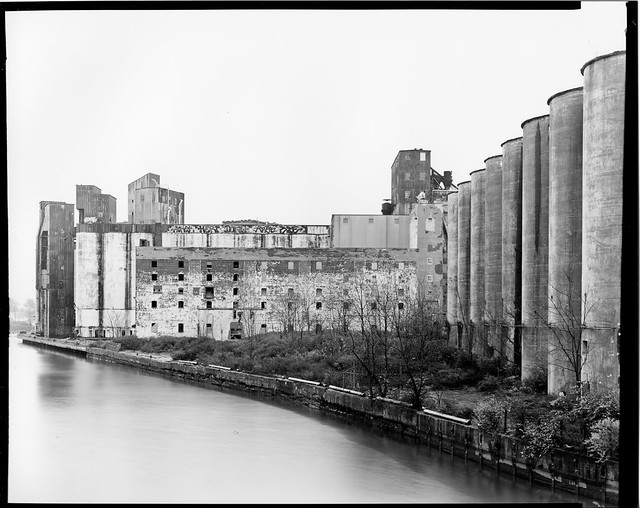
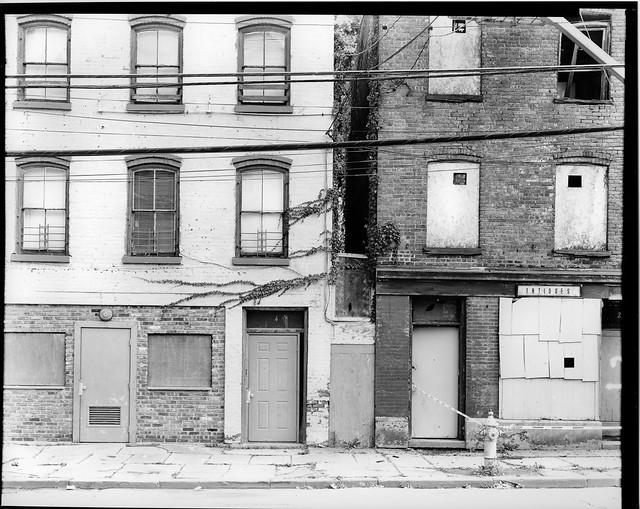
The deep downtown area of Newburg, NY, quite run down, but in a very photogenic way!

This image definitely took some "cojones" to take. I was in a VERY bad neighborhood for quite some time scoping out and setting up this image. Thankfully, I'm still around to share the urban decay of Newberg, NY with everyone. P.S. If it looks like a meth house, smells like a meth house, and has gunfire like a meth house, chances are its a meth house. >__<

Moving on.


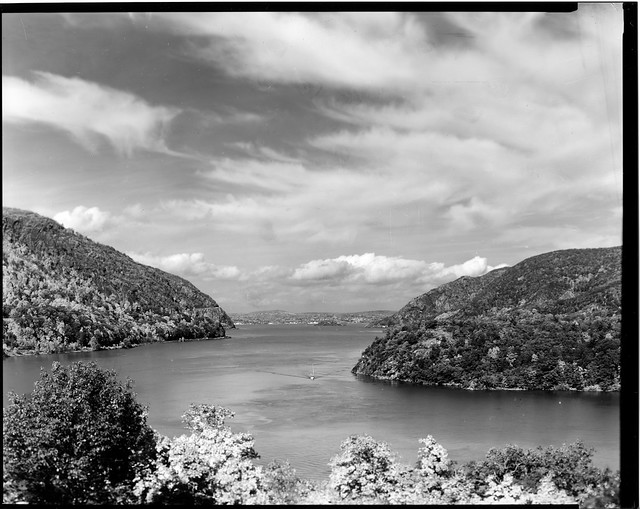
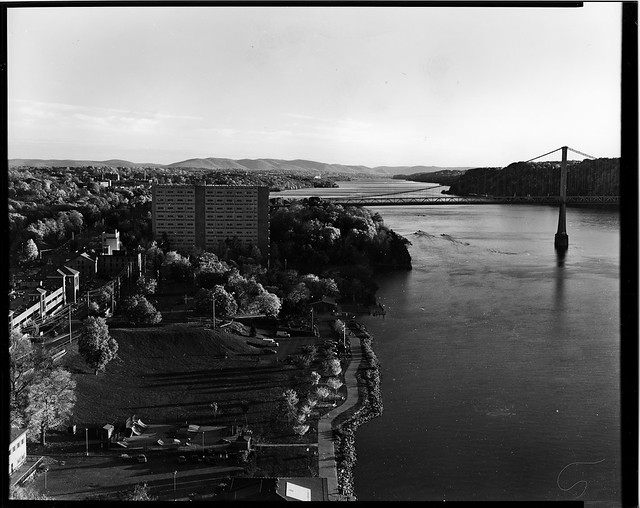
A very unusual view from a scenic outlook of the Hudson River and Poughkeepsie, NY. Just ignore that little "squiggly" in the corner :p

So just when I thought things couldn't have gotten any hairer as they had earlier that day in downtown Newburg, I got hassled not once, but twice by Poughkeepsie police about shooting with my 8x10. Apparently, having anything on a tripod that looks more menacing than a point and shoot is "against city ordinance". After explaining that I wasn't Ansel Adams or planning to score big bucks of the above image, they were a little more relaxed with my shooting; they still followed me back to my car, however. >__>


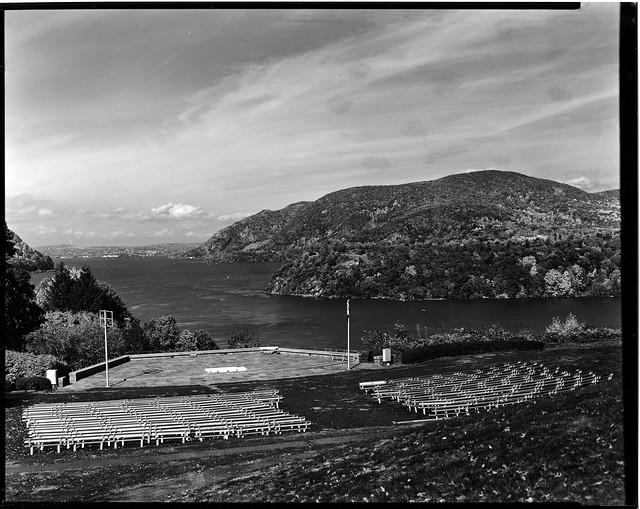
This image helped to kick off my love affair with long exposures on the 8x10. For all you sports shooters out there, you just won't get it.

No real drama with this exposure, unless of course you considering a long exposure in a heavy downpour and 45 degree weather to be a problem. For large format? Not so much. ^__^

Keeping it short and sweet, onto this week's lessons...


Something Good: Each 8x10 sheet metered very differently, but with a little Zone System came out with even density in the negative with consistent print times for the contact prints. Yay!

Somehting Bad: Hair and dust are the bane of my scanning existence, nuff said.

Something Learned: Big cameras attract lots of attention (duh), both good and bad. Know your equipment, but know your photographic environment as well. If things get sketchy, ask yourself if getting the shot is really worth that extra risk.

Next Week: The big 'ole sheets of Tmax 400 keep on coming. And even though there's not going to be any new emulsions or processes, I guarantee the subject matter will keep things fresh!

Tuesday
Mar012011

The 52 Project, Week 28: Large Format from Westpoint

The large scans are starting to roll in and will be posted over the next few days. All of the following scans are made from 8x10 contact prints on Oriental RC VC paper. If you haven't had the chance to try this stuff, it's got a very predictable print time, that translates well over to Ilford Multigrade IV RC VC & FB VC papers. Oh yes, and it's also economically priced in 100 sheet boxes coming in just above Arista EDU products and well below Ilford. As always, click the scans for more specific exposure data. Anywho, onto today's scans:

A scenic from Westpoint Military Academy onto the river. Proof that the Zone System works!

A little bit of spot metering, a dash of the Scheimpflug Principle, and some patience on the subject matter, and you too can throw together a successful landscape, even in harsh early afternoon light. And if you're willing to go the extra mile, selective filtering and compensating in development will yeild even more favorable results in the final print. I wouldn't call the above "final" just a made for the internet scan. Still pretty nice.

Only about 300 yards away from the first image, this second was captured about a half hour later. From what little information I was given about the historic Westpoint campus, I was told this outdoor theatre serves many purposes from commencements to spring and summer concerts. The high contrast afternoon light provided some interesting tones from the brushed silver stadium seating. Those were metered as my Zone VIII highlights and the deeper brush on the middle left of the scan provided a usable Zone II/III shadow.

Something Good: The exposures are fairly even and have a wide tonal range. Turns out writing down exposure data and previsualizing the final image really does help in capturing a landscape.

Something Bad: I'm new to landscapes, hence the slightly boring nature of the compositions. Also, only after making these contact prints did I realize that my contact print frame needed some intense cleaning. Try to ignore the "crud" in the upper parts of both scans. >__<

Something Learned: Patience for landscapes is a virtue that I soon won't have. Some of the greats truly did wait a LONG time to get the image they were seeing in their heads. When given a very strict window of working time, try to document the surrounding area, not make an award-winning landscape.

Next Week: More large format scans! I did shoot a whole box of Tmax 400 (10 sheets) afterall. :P

Tuesday
Feb012011

The 52 Project, Week 24: Ned

Today’s image means a lot of things to me, and I hope it shows. ^__^

Despite the creative mess down there, somehow knows where everything is... 0__0

Meet John Edward Lenhart, affectionately known by everyone else as Ned, my grandfather. Born to a large family in the middle of The Great Depression, Ned’s lived through a lot of ups and downs. Recent years especially haven’t been kind to him. He’s had to tackle a stroke, learning to walk again, losing most of his left lung to cancer, and continuing a silent battle with skin cancer. But as you can see in front of you, not much gets in the way of him doing the things he loves, namely woodworking and baseball.

Since I’ve already captured his baseball loving side HERE, I thought I’d address his other love, in the heart of his basement workshop. Space was tight and light was terribly dim, but I did the best with what I was given, here are the details.

Early one Saturday afternoon at my grandparents’ house, I started to feel the urge to take a picture with the 8x10. And this day, it would be a special one, the day I would finally cave and take a proper portrait. So, as soon as my grandparents were down and out for their afternoon naps, I sprang into action. Grabbing the mass of equipment from the car, I rushed it down to Ned’s basement workshop to set up the entire shot, “Just add Ned”.

Framing up the shot was a little tight with a 50mm lens equivalent in space about the width and length of a college dorm, but I made the best of what time and space I had. Knowing my limitations, the shot was setup expecting about a half length, seated portrait. While focusing and metering the entire scene, I noted a difference in highlight to shadow values of approximately 18 stops! For you non-Zone System users out there, a normal scene has 6-7 stops difference. To say this was a high contrast scene was a gross understatement. Worse news, even wide open (a whopping f/9 on my lens), the Zone II/III shadows in my image were reading 30 seconds. I needed some major light here, and fast.

Luckily for me, I was in a workshop, home to some of the most cost-effective light sources known to man. Two shop lights and a flood-lamp flashlight later, I’ve got my key lights set up and aimed towards the chair that Ned would be sitting in. My exposure now is about 8-10 seconds on Zone V, meaning I needed to underexpose that two stops to Zone III, but then compensate for my bellows draw and movements. Let’s say 4.5 seconds (I did :p). Down came Ned, got set up, and we took the above shot.

Not too shabby eh?

Something Good: For a long exposure, Ned’s looking pretty sharp, and nicely isolated from the surrounding workshop clutter.

Something Bad: The negative itself is a little thin, even for having soooooo much dynamic range. It could have handled another minute or two sloshing in the tray. Live and learn.

Something Learned: Give your subject no excuses to get out of the picture, aka having it all ready for them, and they’ll usually agree to the portrait. On the technical side of things, I learned having a wide SBR, subject brightness range, can be tricky when printing on silver papers; more on that sore subject in later weeks.

Next Week: The 8x10 hits the road on a two week end-of-fall vacation, who knows where it’ll end up!