Entries in home processing (5)

Wednesday
Mar302011

The 52 Project, Week 33: Kittens!

In photography, like anything else, there's a time and place for everything. Some days I'm feeling intense about photography, therefore I bring out the 8x10. Other days its playing around with Polaroids. This week, though all shot on the Hasselblad, is far from being serious business.


Lauren getting a handful of cute. ^_^


A flickr friend of mine, Claygrl, said it best:

"I am not a cat fan, but I did hear a voice in my head say 'Oooh, kittens'."

Cat lover or dog lover, everyone seems to have a soft spot for adorable little kittens. Luckily for me, my parents always have a fresh batch of barn kittens lying around waiting to be photographed. They're not "crazy cat people" yet, but I often fear they are getting there. >__<


This little guy had a cold back then, he's fine now.


This weeks photos were all taken with one of my new low-light favorites, Ilford Delta 3200. This roll was hand processed in Kodak XTOL in a dilution of 1:1, to give the shadows a little extra time to come up, while keeping highlights in check.


*Insert LOLCats-worthy captioning here*


So, aside from testing the film, why 3200 speed film?

Simply put, kittens, puppies, children, and all things youthful tend to move quickly, and with little regard to the fact that you want to take a picture. Once your shutter speed falls below 1/125th of a second, your chances for any sharpness in these little fuzz balls are gone. Cranking up the speed of your film, on top of whipping out some fast glass, is really the only way to stop them right in their tracks. And considering the time of day these shots were taken, about 30 minutes to sunset, being able to snag f/4 @ 1/250th of a second was pretty good!


Closeup filters + tiny kitten = always adorable

Something Good: Got to work with a cute girl, cute kittens, and got a some usable material to boot.

Something Bad: Looking at the tone curve of these images after scanning, the push development may have been a little long. The tone curve was very clumped up in the mid tones with a lot of expansion needed towards the ends. In darkroom terms, I would need to add about 1/2 grade of filtering plus extra print processing time to get the blacks and whites I wanted in the image.

Something Learned: For a 3200 speed film, Ilford Delta has some really nice grain! Upon further review, Delta films are Ilford's signature brand of "T grained" (tabular grained) emulsions. These are comaprable to Kodak TMax 100, 400, and 3200. And coupled with a developer made for push processing such as XTOL, you've got yourself a winning combination.

Next Week: New Year, new gear. Stay tuned!

Friday
Mar182011

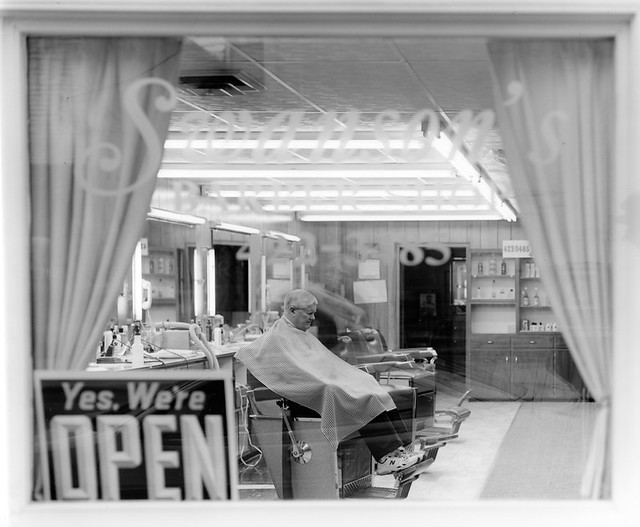
The 52 Project, Week 31: Swanson's on Sandusky Street

What started as a quick practice in large format camera setup has suddenly become my most successful 8x10 B&W to date. 0__0 Here's the low-down.

It was about two weeks after my trip to New York, I was bored, starting to feel the winter weather creeping in, and really starting to miss shooting that big 'ole 8x10. There were still many prints to be made, as I was in the early test stages of fine-tuning my Pyrocat HD developing regimen; aka, the initial contact prints looked horrid. For those of you that follow the blog regularly, you can take this post as the big excuse why my posts started to backup throughout December.

So anyway, I had these god-awful contact prints on the cheapest fiber paper known to man, made under darkroom conditions unbeknownst to cause horrendous post exposure fogging ("Doh!"). I was taking them to my good friend Leslie over at Findlay's only photo-related shop, Imagine That! for some peer review. What I love about Leslie is that she's too nice a person to tell a bad photo off, unless you ask her for her honest opinion. Of course, I did just that and got the earful that was needed; my consolation prize was getting to pet with the "shop cat" Schmoop, a monstrous rag doll cat with enough fur to take out an army of allergic soldiers.  With my now low-hanging self-esteem, I sulked back to the car, when I happened to notice Leslie's next door neighboring business for the first time. It was a quaint little '50's style barber shop with a simple everyday scene occurring. I was so struck, I went in to ask Mr. Swanson's permission for a picture while he finished up yet another haircut. There was very little time for the setup and capture to occur before this haircut was over, and daylight was fading fast. This was the perfect opportunity to capture something meaningful with the 8x10.

And here's what I got:

It's great slices of Americana like this that give me hope for the continuance of Mom & Pop shops in the future. ^__^The exposure was quite a long one, 5-6 seconds, with a LOT of faith placed on the busy barber and his patient patron. I needed as much light hitting the film as I could possibly get, so a lot of swing was used to manipulate my depth of field while keeping the lens close to wide open. Only after processing the film did I realize there was MORE than enough light captured, I had in fact created the most dense Pyrocat negative I'd ever seen. >__< Just to get the "crappy" print on RC paper needed a low f-stop and a lot of Grade 0 time on the enlarger. Translation: I ignored protocol and consistency of calibration in order to get a cool shot, much paper would be wasted in obtaining a good print.

All in all, the severely diluted Pyrocat HD came through for me in preserving the highlight detail in the fluorescent bulbs while pulling out plenty of shadow detail towards the back room of the barber shop. No complaints in the image department, except maybe the overall framing (or frame within a framing :p).

When I started printing bigger, 20x24 fiber prints to be exact, you can bet multiple, multiple copies of this print were made. They're all pretty close to one another, with some softer in contrast than others. Dodging and burning gets a little trickier when dealing with split-grade printing; more about that insane process another day. So far, the prints have been doing incredibly well. It's three for three thus far, getting into:

So what was learned from this image?

Something Good: It appears to have an impact favorable to a majority of viewing audiences. Perhaps its the simplicity of the image, or the familiarity of the subject matter. Either way, it's doing quite well in the aesthetics department.

Something Bad: This neg is dense, like 5+ minute print times dense. I'm terrified to use reducer as I've heard horror stories about what it can do to pyro stain. The flip side is this makes a fabulous negative for Platinum/Palladium printing should I ever have enough disposable income to start "printing money".

Something Learned: Judging from the very few images I've taken which include other people, I'm starting to tell that I like environmental portraiture, a lot. Not that head-on portraits without context are a bad thing, I just feel they're a waste of the detail capturing power of 8x10.

Next Week: We're going back down to medium format, for some off-beat fun shots. Don't wanna get too serious for a personal blog. :p

Tuesday
Mar012011

The 52 Project, Week 28: Large Format from Westpoint

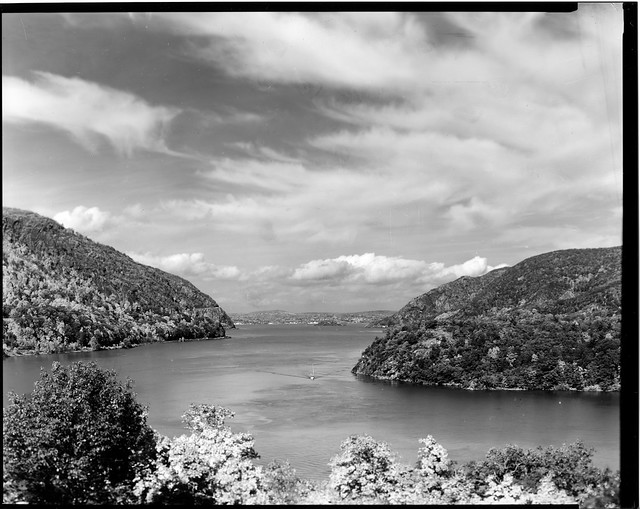
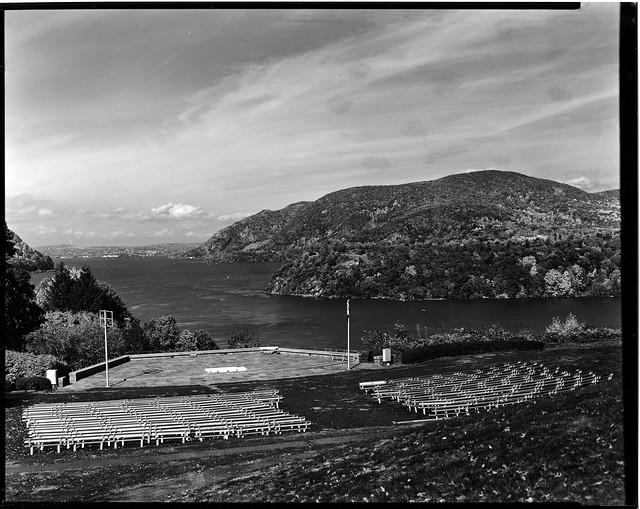
The large scans are starting to roll in and will be posted over the next few days. All of the following scans are made from 8x10 contact prints on Oriental RC VC paper. If you haven't had the chance to try this stuff, it's got a very predictable print time, that translates well over to Ilford Multigrade IV RC VC & FB VC papers. Oh yes, and it's also economically priced in 100 sheet boxes coming in just above Arista EDU products and well below Ilford. As always, click the scans for more specific exposure data. Anywho, onto today's scans:

A scenic from Westpoint Military Academy onto the river. Proof that the Zone System works!

A little bit of spot metering, a dash of the Scheimpflug Principle, and some patience on the subject matter, and you too can throw together a successful landscape, even in harsh early afternoon light. And if you're willing to go the extra mile, selective filtering and compensating in development will yeild even more favorable results in the final print. I wouldn't call the above "final" just a made for the internet scan. Still pretty nice.

Only about 300 yards away from the first image, this second was captured about a half hour later. From what little information I was given about the historic Westpoint campus, I was told this outdoor theatre serves many purposes from commencements to spring and summer concerts. The high contrast afternoon light provided some interesting tones from the brushed silver stadium seating. Those were metered as my Zone VIII highlights and the deeper brush on the middle left of the scan provided a usable Zone II/III shadow.

Something Good: The exposures are fairly even and have a wide tonal range. Turns out writing down exposure data and previsualizing the final image really does help in capturing a landscape.

Something Bad: I'm new to landscapes, hence the slightly boring nature of the compositions. Also, only after making these contact prints did I realize that my contact print frame needed some intense cleaning. Try to ignore the "crud" in the upper parts of both scans. >__<

Something Learned: Patience for landscapes is a virtue that I soon won't have. Some of the greats truly did wait a LONG time to get the image they were seeing in their heads. When given a very strict window of working time, try to document the surrounding area, not make an award-winning landscape.

Next Week: More large format scans! I did shoot a whole box of Tmax 400 (10 sheets) afterall. :P