8x10 in Infrared
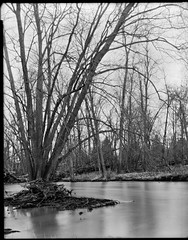
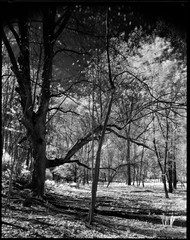 My first IR image ever! Spring weather has been around for nearly a month here in Northwest Ohio, with more cloudless, sunny days so far than I can recall in the past four years! With skies so clear and temps so moderate, it was only a matter of time before I thawed out "the stash" and tried my luck at infrared (IR) photography.
For those who've never heard of IR before, basically you're capturing electromagnetic radition in the 700nm wavelength range and up (depending on your film/camera's sensitivity). This unique range of light results in a very distinct look to the infrared photos. They're often recognized by deep dark skies, jet black water, dreamy white foliage, and kinda creepy tonal reproduction on people. I'll just be talking about is B&W infrared, as there's really not a lot of color IR film left out there. A vast majority of the IR work you'll see out there is from modified DSLR's, which have a wide range of IR effects. With film infrared, the results are a lot more about the film and filtration, and less about the camera used.
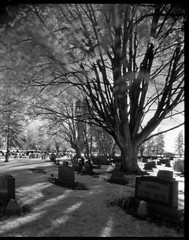
 Mmm, mmm those dreamy highlights!A little over 6 months ago, I found a gentleman selling all sizes of Efke 820c infrared film for dirt cheap prices. Doing what any film shooter with G.A.S. would do, I bought a 50 sheet case of 8x10, hoping for the day I would have a good IR filter and some nice weather in Ohio. Thanks to Leslie at Imagine That!, it wasn't long before a nice Tiffen #87 filter came my way, and the experiementation began. Now whenever you start shooting an new film in large format, usually a fair amount of testing is required to get your process nailed down. Effective ASA, development times, dilutions, printing times, and more all change along with the newly added variable. Thankfully, this was the fourth (maybe fifth) film I've taken the time to test, so the process wasn't too wasteful, only two sheets "lost" in the testing process. For some practitioners of the Zone System/Beyond the Zone System/Other Zone Systems, film testing can easily get out of hand, with dozens of sheets being sacrificed all in the name of meticulous control. I don't try that hard for the perfect exposure, but I did manage to bracket the inital test exposures and find a working ASA based off of the test sheets stain density.
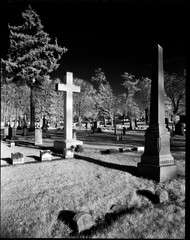
 Looks good even with flare! Basing my tests off of the Efke IR 820c Data Sheet availalbe at Freestyle Photographic Supplies, it appeared that a #87 filter with this film would yeild an effective ASA of anywhere from 3-6. So, the first two sheets of film were exposed accordingly, accounting for this film's worse-than-Tri-X-reciprocity. My new standard development time for medium speed film is 12 minutes in Obsidian Aqua 1:500 at 70 deg. F. With the final image stain coming out in both images as much thinner than normal, the ASA 3 sheet "scan-able" but not printable, I knew I needed another stop of light to give these images the "pop" they needed. All of the images seen on today's blog post were taken at ASA 1.5, and though very long exposures, are exactly what I was looking for with this IR film.
So what does everybody at home think? Keep going with this IR stuff? Personally, I like it enough to shoot it ocassionally, and printing it isn't that bad either. I don't foresee going off the deep end and only doing IR landscapes, but it's a neat novelty that may warrant its own gallery in the near future. Though these first attempts were fun, there's a limited supply I'm working with, and plenty of shots I'd like to reserve for traveling over the summer.
 What I'm going for, maybe more clouds...If you'd like to try out your own infrared film, I'd suggest picking some up at Freestyle, as they have a larger selection than most, and are a one-stop-shop for all things analog. If you're hard up on a filter, you may want to snag one of those as well. So as long as you're up to spending a few frames and some time in the name of getting the right exposure/development times, infrared photography can offer you some very unique, visually exciting results. If you've got any more questions about IR techniques, large format IR concerns, or want to go out shooting IR sometime, hit me up via the comment option below, or the contact button at the top of this page.
As always, happy shooting, and long live film!
 Photography, darkroom

