Entries in tmax 400 (12)

Wednesday
Jan122011

The 52 Project, Week 22: Sunday, Sunday, Sunday at the Motocross

Processing last week’s negative late one Friday afternoon, I found myself anxious to shoot even more of this large format stuff. Within minutes of this hankering, my LF sponsor/mentor/camera donor Spencer came up to the lab to extend an invitation my way. He was going to take his freshman digital photography class out to Delta, OH to cover an all-day motocross event. Not seeing how I could possibly do sports photography with an 8x10, I accepted the invite, seeing it as a personal challenge.

Long story short, this motocross and all the people there were very cool. Though many folks looked at me as though crabs were crawling out my eyes, I was allowed access to all of the course, getting me really close to the action. One question remains, however...

How does one capture high speed action with a view camera?

Just like they did it back in the early 20th century, of course. ^__^

Step 1: Pick a good vantage point capable of producing interesting subject matter.
Step 2: Pre-focus the image, utilizing rise, fall, swings, and tilts to maximize depth of field.
Step 3: Meter, meter, meter some more. Focus again, stop down your lens, and meter again.
Step 4: Close your lens, insert your film holder, remove darkslide, covering back of the camera to insure against light leaks.
Step 5: Wait for the action to come to you. Plunge down the shutter release a split-second before the intended composition falls into place.
Click image for more exact exposure information.
Voila! Now all you have to do is not screw up any of your processing. Though easier than it sounds, I took 5 shots that day, and here’s the best/least screwed up of them all:


Something Good: The shot definitely has adequate action, composition, and depth of field.

Something Bad: The subjects are a little dark, but this was a trade-off for overall tonality of the image (deep blacks, lots of middle greys, bright whites). This was likely a result of using a Red filter (-2.5 stops of light) and only compensating 1-1.5 stops due to shutter speed limitations (max of 1/150 sec.)

Something Learned: With a lot of patience and practice, we’re talking a 6 hour day of trial and error, you can shoot anything with a view camera. And just like any kind of woodworking, measure twice (at least), and cut once (take the shot).

Next Week: Finding comfort in repeatable subject matter, a good thing or getting lazy?

Saturday
Jan082011

The 52 Project, Week 21: The Large Format Candid

What’s the first thing that comes to your mind when bored on a late September afternoon? No matter your answer, I’m positive nobody else responded,

“Take my view camera out on the streets, of course!”

I've taken to scanning 8x10 proofs, they're easier.

“Huh, this kinda looks like a candid,” one might say. Well, it most certainly IS. Here’s the long version.

Itching to see what the view camera can do with people in the picture, I loaded up the 50+ lbs. of equipment into my car, driving until I was struck by something interesting. Little did I know, that drive would be only about half a mile drive from the University of Findlay campus.

There it was! This poorly kept, icon of dilapidation just begging for an interesting photograph.

“Hmm, there’s still a little too much symmetry there for me,” I thought.

Looking down at my watch, it was 2:50pm, school was almost out. Somebody was just bound to bike/run/walk through my frame. Little had I remembered that my metal monstrosity of a camera is less than inconspicuous. >__>

Luckily, I had my handy dandy decoy tagging along with me. My first attempt at a set of subjects involved a brother and sister pair of school children. Lauren had them all but coaxed, until the little 1st grade girl, wise for her precaution, decided it would be better to not be in a picture taken by a stranger. About ten more minutes went by, and then, there he was. Overweight, wearing a cut-off shirt, and he even had his dog with him. This was it!

Removing the darkslide from the film holder, I readied myself to release the shutter. But just as my subject starts walking into the shot, he looks my way.

“What do I do? He’s looking at me!!” D8 “Quick Mat, think fast; do something, anything! Just DON’T look over at him.”

Having run out of things to do at the last second, I leaned in towards the lens, turned away, and pretended to clean the lens during the 1/15th second exposure. And there you have it, the large format candid, or as candid one can make an 8x10 camera.

Something Good: I got the shot I’d envisioned in my head, thanks to careful metering, pre-visualization, patience, and steady processing.

Something Bad: This shot took a while, again. About an hour in the field, and a little over a half hour in the darkroom; too bad the darkroom times can’t really be brought down too much.

Something Learned: It’s not impossible to go somewhere with a shot in mind, but very hard to get the shot you’re looking for before you get there. Any number of unpredictable things can happen, and it’s best to keep an open mind about what you want in the shot. If you don’t mind camping out a while, by all means, wait till the shot walks in front you; and at $10/shot, I’ve got all day. ;)

Next Week: We’re off to the races! This time capturing action with the 8x10...seriously.

Tuesday
Jan042011

The 52 Project, Week 20: The Longest 20 seconds of My Life

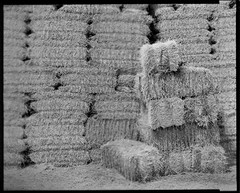
It’s a giant stack of straw bails, how hard of a picture could that be to take? With an 8x10 camera, it was quite the daunting task. Let’s go to the play-by-play.

I blame the focus weirdness on the V700
Searching around for something to shoot that definitely cannot move, I find myself driving over to one of my dad’s many straw barns. Lugging the 50+ lbs. of gear into the barn, it’s fifteen minutes before I even have the lens cap off and am ready to begin focusing.


“Oh man, it’s really dark even on the ground glass wide open,” I say to myself.


I pull open the barn door at the far end of the barn, letting a weak, but soft light source fill the front of the image. By thirty minutes, an image is really coming together, sitting upside down and backwards on the ground glass. Now it’s time to meter.


“Shadows are 1 min. at f/32” as I jot down notes from my light meter.
“Underexpose three stops pushing them into Zone II while adding 1/2 stop bellows factor. Now I’m at about 20 sec.’’


I hook up the 2’ cable release to the lens, close the lens, cover the ground glass with dark cloth, and now it’s time for the film. Taking the film holder out of the bag, I’m quick to attaching it to the back of the camera, placing the holder between the ground glass and the bellows. I hear a heart-wrenching “snap” as the holder slips into place. I carefully withdraw the dark slide, and “click”; of course this click lasted 17 nerve-racking seconds.

And so ends just another “simple” 8x10 exposure. Maybe someday later I’ll come back with some “Tales of Tray Processing” and “Film Loading Follies” to accompany this story. But for now, this week’s wrap-up.

Something Good: It looks like a stack of straw bails, and my word is it SHARP!


Something Bad: Light leaked in during the course of loading/unloading/exposure. Still not sure which, but I’ve since exercised proper precautions and have had little troubles.


Something Learned: I need to get much faster at setting up and tearing down this camera. This one exposure clocked in at just over an hour when all was said and done. The last time I took a similar shot (link), that “process” was about five seconds worth of composition. Is the larger negative worth all the trouble? I guess that’s for each of us to decide.


Next Week: Taking the 8x10 to the streets. Good times, good times. ^__^

Page 1 ... 1 2 3 4